Overview
For this project, I created a fast fix repair guide for a broken item then submit it to the technical writing team at iFixit, a company whose mission is to empower people to repair their broken items and to keep them out of landfills around the globe. While the focal point of iFixit’s mission is on toxic electronic waste, they also provide instructions for household and apparel repair which is why I chose to author a repair guide for a broken leather belt. Though the repair guide I authored is for a broken leather belt, the instructions can be applied to other genuine leather products to repair or repurpose these items and extend their service life by bringing it back to like new condition.
Tasks
To complete my Fast Fix Repair Guide, I worked over a four-week period to complete different phases of the project. The tasks I completed for my Fast Fix Repair Guide are as follows:
- Write and submit a proposal for my Fast Fix Repair Guide project.
- Take photos for each step of my Fast Fix Repair Guide project.
- Write text for each step of my Fast Fix Repair Guide project.
My Process
The process started with identifying a broken item that I could develop a Fast Fix Repair Guide then draft a detailed proposal for how I would repair my broken item. In my project proposal I specified what item I was going to write a repair guide for, the items that I would use for the repair, and the camera that I would be using for pictures of each step of the repair. Once I completed my project proposal, I submitted it to the technical writing team at iFixit via email for their approval of the project.
Fast Fix Repair Guide Proposal
Once I received approval for my project I started work on Checkpoint 1 – Guide Images.
Checkpoint 1 – Guide Images
To make my Fast Fix Repair Guide easier to follow despite potential language barriers, I used the 48-megapixel main camera on my OnePlus 10 Pro cell phone. This checkpoint involved taking several images then selecting the best ones for my Fast Fix Repair Guide. The best images had good lighting, minimal to no shadows, and clearly demonstrated the process for each step. Once I uploaded my selected images to iFixit via the repair guide authoring tool, I emailed the technical writers at iFixit for their approval. Some of the first images that I took wound up being just a bit too dark, so I re-took the images making sure improve the lighting then emailed the technical writers at iFixit that I updated the images. Even though I had to re-take images, my project stayed on-track to be completed on time.
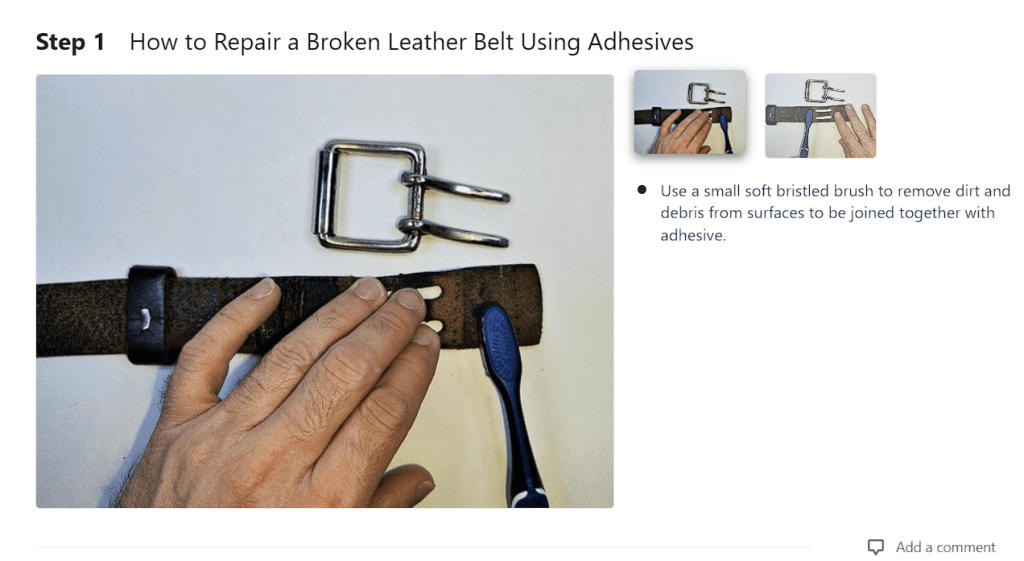
This is an example of the step 1 image that shows good lighting on the subject and demonstrates the process for cleaning the surfaces of the leather belt that will be joined with adhesives.
After my images were approved I started work on Checkpoint 2 – Guide Text.
Checkpoint 2 – Guide Text
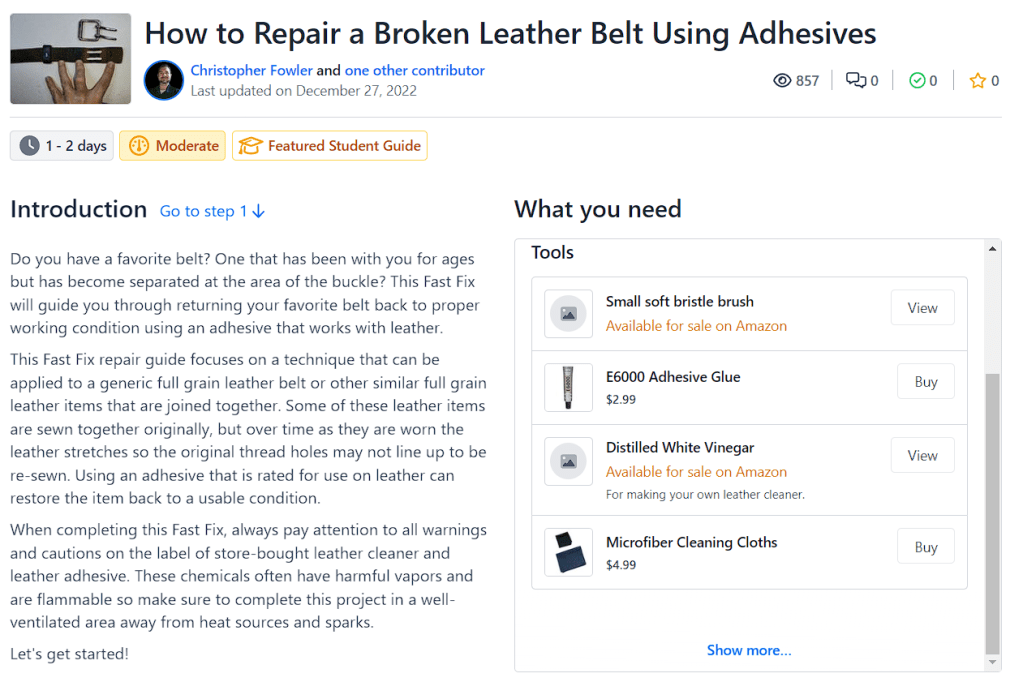
In Checkpoint 2, I created text to accompany each step’s image. I started by creating the text for each step of my repair guide, making sure to use plain language and to clearly state what was to be completed for each step. Once I had the text for each step created I wrote a creative introduction to serve as a brief overview of my Fast Fix Repair Guide and to make mention of any warnings and cautions that should be observed.


*Note: The other contributor for this project is an employee of iFixit and only provided project editing services for publishing on their website.
Results
The end result of my Fast Fix Repair Guide project is that it was published to the iFixit website and I received a letter of recommendation from iFixit. This is a project that I greatly enjoyed because I was able to contribute directly to iFixit’s overall mission of keeping broken items that can be repaired out of landfills.
Furthermore, I learned the process of creating an effective guide that is easy to follow. From taking pictures with good lighting that demonstrate a process to writing text in plain language the end users of my guide can easily understand. This was also my first experience in writing a project proposal in a real world setting for a live client.
Since my Fast Fix Repair Guide was published, it has been viewed by more than 2100 people. To me that is 2100 people that I potentially helped repair a broken leather belt (or item) rather than send it to the landfill. Click here to view my full published Fast Fix Repair Guide.
